At the risk of sounding like a grandfather mourning “the good old days”, I’m going to use this blog to highlight what I think is a real change for the worse in our sport over the last 20 years or so. That change is the fading away of ‘boatmanship’ – the art of handling a boat that extends beyond the narrow definition of “rowing”. Boatmanship includes much of what crews do in the boathouse and on the landing stage (if your club has one), but I’m going to limit this blog the handling of the boat as it gets onto the water.
In a previous blog (https://therowingclub.wordpress.com/2014/06/16/are-you-a-crew-before-you-get-out-on-the-water/) I wrote about the importance of working together as a crew from the moment hands are put on the boat at the start of an outing. Here I’m going to emphasise some basic rules of boatmanship which seem no longer to be part of the coaching syllabus at many clubs. I see the loss of these rules mainly in crew boats, because for single scullers and small boat crews, failure to follow these rules will dump you into the river. It’s the bigger crew boats – particularly the eights, where the rules seem to have gone. In aviation there’s an old saying that “any landing you can walk away from is a good landing”. The boating equivalent these days seems to be that “if you can get the crew into the boat without capsizing, that’s good enough”.
Any coach should aim to produce crews who know enough to keep themselves safe and keep other river users safe. Here the main threat to crew safety is simply the instability of the boat. I’ve seen rowers old enough to know better capsize into the river while loading a four. While I’ve never actually seen an eight capsize, I’ve seen people fall out of them and I’ve seen people injured by poor handling of boats and blades. These rules are meant to address those risks.
Rule 1. Once the boat is on the water, one crew member should have responsibility for holding it while the rest of the crew get the blades. All the landside blades should be fixed in their swivels, fully extended at right angles to the boat with gates locked before anything else is done. The weight of the landside blades will help to keep the boat from capsizing into the river. Scullers learn this on day one and it should apply to all sculling and rowing boats.
Rule 2. Once the landside blades are in and locked, the rowers using those blades should be holding the landside riggers down to keep the boat level. If you’re boating from a landing stage this is easy. If you’re boating with your feet in the water it is less so. Only once the landside rowers are holding the boat level should anyone put their weight on the boat.
Rule 3. Once the landside crew members have control (from outside the boat), the waterside crew members can load and lock their blades. All of the waterside blades should be fully extended on the water in the feathered position before any of the waterside rowers gets into the boat. If the blades for any reason aren’t extended when the waterside rowers get in, then getting the blades onto the water and the boat level is their first task – *before* they start fiddling with their shoes.
Rule 4. Once the waterside rowers have control of the boat, the landside rowers (and cox if you have one) can get in.
Landing and unloading the boat simply requires the reversal of the above procedure, with the cox and landside rowers out of the boat first to hold it steady and the landside blades being the last to be removed before the boat is lifted from the water.
There is of course much more to boatmanship than this, but in my view these are the bare essentials which too many crews are forgetting and crews without this basic knowledge are a safety risk to themselves and others.
Scullers and the stroke seats in coxless boats have for years now had the benefit of modern digital technology to measure stroke rate and speed. It may be just an app on a smartphone or a dedicated rate-meter but there is a general acceptance that these digital aids bring real benefits, whether training or racing.
The exception seems to be the rower in the number 8 seat. Because s/he is seated facing a cox equipped at least with a cox-box and these days often a dazzling variety of other digital gadgets the idea that the stroke seat needs at least a rate meter isn’t yet widely accepted in the same way.
To be fair, there are one or two valid arguments against the duplication of information. The first is the fundamental understanding that that in a coxed boat, the cox is in charge and is ultimately responsible for the decisions and instructions given to the crew. A second valid argument is that the duplication of information might be inexact, resulting in cox and stroke looking at different numbers.
That said, I don’t think either of these arguments is ultimately decisive. In any competent crew, cox and stroke work in partnership and communicate with each other more than with other members of the crew. That partnership is not undermined by giving stroke a digital rate-meter. Coxes have a lot to do and allowing stroke to know the rate without asking the cox is a benefit to both parties. The possibility that the cox-box may give a different rate than the rate-meter is real but with modern digital equipment not an insuperable problem as I hope to show.
The key benefit to giving the stroke seat their own rate-meter is that they get constant rather than intermittent information on the stroke rate. Just as a sensitive thermostat makes a heating system more efficient by avoiding large swings in temperature in your home or office, constant rate information helps crews maintain boat speed efficiently with minimum changes of rate. No cox can give constant feedback on the stroke rate. They are busy looking after the boat and crew and will give intermittent rate information to the crew. The cox may give stroke rate information more often if it is changing (intentionally or unintentionally) but there will always be gaps, and those gaps are the problem.
Any less-than-perfect stroke rower is going to deliver a stroke rate that varies slightly. Giving stroke his or her own rate meter won’t eliminate this, but it will improve it, because they will be able to apply smaller and more frequent rate corrections. Any rower knows that when the cox calls “up two”, particularly at race pace, there’s significant extra work to do to gain those extra two strokes per minute. By contrast, very few coxes are going to call “up one” (or “down one”) because they would be responding too often to very small changes in boat speed. So if a crew is for example seeking to maintain a stroke rate of 36spm, the cox won’t usually call for a correction when they see the stroke meter show 35spm but will do so when the rate falls to 34spm. However, if the person in the stroke seat can see that the stroke rate has fallen from 36 to 35spm they can correct earlier, before the boat loses much speed and before recovery of the correct rate involves a great deal of additional work.
This is where the potential differences between the cox-box and stroke’s rate-meter might become an issue, but there is a simple solution. In any disagreement, the cox has the final say. If the equipment is reliable and well-maintained the differences should rarely be more than one or two strokes per minute and with experience the crew should be able to spot whether there is a consistent calibration error one way or the other between the two devices.
My personal opinion of drills as a coaching resource is that they should be used as “remedial rowing” for correcting faults and occasionally when rowers need to be reminded to concentrate. There is one drill which is an exception to this and that is the roll-up.
The roll-up, for anyone who isn’t familiar with the term, is a ‘recovery phase’ drill – taking rowers and blades smoothly from the finish position at backstops to the catch position at frontstops, but (usually) without taking a stroke.
This video shows the basics of the roll-up drill in a rowing tank (copy and paste the link if it doesn’t play first time): https://youtu.be/Mg_xPcy8hiE
For less experienced and beginner crews I coach the roll-up as a continuous movement, with no pauses.
When executed by the full crew this naturally requires a well-balanced boat as all blades will be off the water. Unsurprisingly, most coaches and crews regard the roll-up as a timing and co-ordination drill – which it is to some extent. However, it’s interesting and useful because it can be most effectively taught as a test of body posture and core stability.
I speak from experience, having tried to teach roll-ups the traditional way for several seasons. Watching crews flopping sideways repeatedly as they tried to get their blades out of the water left me searching for a better way. Eventually light dawned when I realized that the same techniques which worked in balancing a moving boat would work on a static one.
The beauty of this breakthrough was illustrated by the fact that whereas previously I had only taught roll-ups successfully to more experienced crews, I now teach it successfully on beginners courses to rowers with less than a dozen outings rowed.
I’ve written about Balancing the Boat in a previous blog here: https://therowingclub.wordpress.com/2013/12/03/balancing-the-boat/ and with hindsight it now seems obvious that coaching very similar techniques would work in enabling a successful roll-up. That said, because the roll-up is effectively a static drill, balance becomes more important than timing in the roll-up, whereas the reverse applies in a moving boat.
To start from the beginning then, the key to coaching the roll-up is to start with a perfectly stationary, level boat. With beginner/novice crews this us best achieved by using some crew members to sit the boat level, while the others practice the drill. More experienced crews may not need that help.
The crew members doing the drill should be at backstops in the finish position, with their blades squared and floating (this is important). Even more importantly, they need to focus on keeping their heads as high as possible throughout the drill and their cores activated by pulling their stomachs slightly inward.
On command, the drill begins with the tap-down. Because the crew is starting from a static position, the tap-down may feel slightly faster than usual, and I find that in an unstabilized boat, the rower with the slowest tap-down usually fails to get their spoon out of the water at all. Once that rower has matched the rest of the crew in hand speed all the spoons will be extracted at once and the challenge then is to keep the unsupported boat level as the crew goes through the recovery (hands away, bodies over and forward to place the catch at front-stops). Novices tend to rush the recovery, particularly if they feel they’ve had to rush the tap down. However, what’s needed is a calm, deliberate and “technical” recovery with the focus on the “heads up, shoulders down, stomachs in” body posture. If the crew blame the boat for any instability, remind them that they weigh much more than the boat they are in – so if they stay balanced the boat really can’t unbalance them.
If the crew concentrates on body posture and core stability then performing the drill with all blades is within the capability even of novice crews, and importantly it gives novice crews real confidence in their ability to stabilize the boat.
Common errors
As mentioned above, a slow tap-down / extraction can unbalance the boat right at the start of the drill, but this is quite easy to spot. The boat will always fall to the side with the slow rower, so spotting and fixing the problem is simple.
Timing can be challenging for novice rowers. The contrast between the rapidity of the tap-down and the controlled movement through the recovery conflict with each other. However, provided the rower in the stroke seat can execute the drill at the right speed, then repetition (particularly if supported by video feedback) can correct this fault.
Lack of confidence can be an issue with this drill. I’ve seen crews get though most of the recovery only to lose the balance before getting to the catch, simply because one or two members have panicked at having no visible means of staying balanced. Calm confidence is almost as important as body posture. They need to keep their heads up, bodies and feet still. (More advanced crews will be able to execute the roll-up more slowly than novice crews and will use foot-pressure as well as body posture to maintain balance).
Hand height errors at the catch, right at the end of the drill can be an issue in sweep-oar boats. Eights are reasonably stable, but fours much less so, and if a crew member in a four gets their hand height wrong at front-stops (the most common error is to drop their hands too low), the result can be a rapid capsize. It is, of course, advisable to warn crews of this possibility beforehand.
Once a crew has mastered the roll-up and understands the techniques which make it work, I invariably see increased confidence and better balance in the boat, and I can’t think of any other rowing drill which has a comparable effect.
Let me say first of all that in my view, the foot-straps on every ergometer are there for the athlete’s safety and any coach who feels that he or she would be compromising their athlete’s safety by doing without them on low-rate endurance ergs should feel free to ignore this blog.
For those still reading, here’s an interesting observation. I routinely teach beginners to do any erg sessions at 20 spm or lower, without straps. A recent group of student beginners arrived at the club already trained on the erg and I introduced them to strapless technique. After a short erg some of them reported feeling that they were doing much more work with their hip flexor muscles – exactly the muscles which would be working more consistently to maintain their upper body posture when using the erg without straps. That is a good thing. It meant that they were now using muscle to compensate for the support they had been getting from the straps, particularly at backstops.
It is important, because if a rower is dependent on the straps to maintain balance while on the erg, they’ll be dependent on their shoes to maintain balance while rowing – and that will tend to disrupt the balance of the boat. The forces exerted on the straps or shoes at the end of the drive phase (the finish) are (1) in the direction of movement, to absorb the inertia of the rowers body weight moving to backstops and (2) upward, to stop the rower falling backward as they lean back. It is the upward component which is disruptive, because people are not symmetrical and so it is almost impossible for the force to be exerted equally on the two shoes. One will be pushed upward more strongly than the other and the boat will respond by rolling downward on the opposite side.
Rowers are only made aware that this is effect if and when they are asked to row “feet out” (i.e. feet outside the shoes) and even though this awareness helps, without the development of the hip flexor muscles on the erg (by doing low rate endurance sessions without the straps), they won’t have the muscle tone to correct it.
So with the caveat on safety at the top of this blog, I’d encourage coaches to develop strapless / feet out technique on the erg as a real aid to boat stability.
The key requirement for growing membership is to actively recruit new members faster than you lose existing members, while maximising retention. Junior squad recruitment must be focussed on the lower end of the age range, while adult recruitment should be age-blind. All beginners need to be managed in “cohorts” of similar experience for about 12 months following their entry to the sport, with a clear route for progression through the club to whatever level of rowing they aim to achieve. This particular blog does not address the challenge of recruiting the best available athletes. For some ideas on that, see:
Turning enthusiastic beginners into long-term club members.
There is real enthusiasm for rowing as a sport in the UK and indeed across much of the sporting world. Reasonably priced beginner courses are easy to fill and junior (under 18) rowing is similarly a growth area. However, some community-based clubs (i.e. clubs not affiliated with a school, university, commercial company or the services) struggle to convert this enthusiasm for the sport into sustained membership growth. Conversion rates from beginner courses to ongoing club membership of a year or more can frequently be under 5% and losses as members move on through work or family commitments are a continual challenge for many clubs seeking to maintain membership numbers.
My personal experience is that it is possible to deliver conversion rates around 50% from adult beginner courses (ie 10 members from a 20-strong beginner group) and while these courses may yield only small numbers of top athletes, they do bring into the club a mix of skills, experience and enthusiasm which any modern sports club will find useful. I would argue that a deliberate policy of recruiting anyone who is interested through regular beginner courses is essential to any club which claims to be community-based.
Progression is key
From the point of view of beginners entering the sport, at the end of a learn-to-row course, they may have mastered the basics of rowing, but they will not have the skills to join an established crew. And however enthusiastic they are about their new sport, if the club where they learned to row cannot offer them an appropriate seat in a boat on a regular basis then they have no real opportunity to establish themselves as club members. For this reason, I would suggest that learn-to-row courses are best not treated as stand-alone events (although they can be a useful source of revenue) but as the first step on an ‘escalator’ which will move rowers in easy stages and in the company of the cohort they learned with, through novice regatta competitions and then on to whatever level of rowing suits them and their personal circumstances. This applies as much to junior rowers as to adults, with the added complication that junior rowers are classified into age groups for competitions and therefore need to be put into crews with rowers of their own age as well as a similar level of experience.
Squad structure
For juniors, this strategy requires that (unless you have a lot of spare coaches) recruitment via learn-to-row courses is focussed almost exclusively on 11 and 12-year olds . This creates a cohort of young rowers who can train and compete together and who will progress through the junior age categories together. Older juniors recruited as beginners should be the exception rather than the rule – although we can all probably think of a teenaged starter who did well. This may be somewhat harsh on teenagers who discover an interest in rowing a few years too late, but they can be difficult to incorporate into an established squad, most of whom will be years ahead of them in terms of experience.
Adult beginners are enormously helped by the provision of a structured follow-on environment from the Learn-to-Row experience. At our club we created a ‘Development Squad’ which takes a cohort of rowers who have completed a beginner course and keeps them together for regular rowing and training for a maximum of 12 months. The Development Squad aims to take one or two cohorts of beginners from the end of their course to their first season of novice competition. From that point they can graduate to other squads in the club (senior, intermediate or masters) depending on their personal aims and circumstances. Having been club members for almost a year by this point, they have the confidence and knowledge to choose their own directions.
As they move on to other squads as experienced rowers, another cohort of beginners take their places in the Development Squad.
Coaching
For most clubs, the availability of coaches (and coxes) are significant constraints. While some small clubs can apparently manage almost entirely without coaches, this tends to limit their ability to take on rowers of different abilities and such clubs won’t have junior squads. This is not the place for a discussion of the merits of paid vs volunteer coaches, but the delivery of a graded squad structure and a club’s ability to retain existing members is largely dependent on the availability of suitable coaches. The maintenance of a reliable pool of coaches is fundamental to the success of any larger club plan.
British Rowing has put a great deal of effort into producing a practical coaching qualification system for UK clubs and once you have recruited a coach, subsidising their training on BR courses (in return for a commitment to coaching at your club) can be helpful in retaining them. Junior rowers tend to bring their parents with them and parents who start as bank-riders can, with appropriate training courses, become useful and effective coaches. Club alumni are also a potential source of coaches. That said, recruitment of coaches is challenging, particularly when discounted club membership fees and an enthusiastic bunch of rowers are essentially all a club can offer and if there is an easy answer to this difficulty, I haven’t yet found it.
Every club is different, but most clubs face the challenge of recruiting new members as existing members move on. New beginners at both junior and adult levels are an important part of the solution, but beginners must be provided with opportunity to row together with others at their own level for about 12 months if they are to establish themselves as long-term club members.
(This is the fourth in a series of coaching notes and is probably best read with the preceding “Coaching the Finish”. The techniques described apply primarily to rowing rather than sculling and to bigger boats rather than small ones).
The Recovery should be easy, surely? We’ve done the hard work on the drive. We’ve got the spoon out of the water at the finish and we’re on our way back to the catch. What is there to coach on the recovery?
Well here’s the thing. While it might take a trained eye to spot if your catch, drive or finish is good, anyone can judge the quality of a crew from their recovery. Good crews make it look easy. All the spoons leave the water together and move through the air at the same height and speed until they enter the water together at their next catch. Meanwhile their boat stays perfectly level, moving forward as if on rails.
No-so-good crews can’t do this. Their boat is off-balance during the recovery with one side of the boat higher than the other – or one side’s blades may even be dragging across the water to the catch.
I’ve referred elsewhere to the “hierarchy of needs” within a boat, namely Timing, Balance and Power – in that order, with timing being the fundamental requirement, balance being built on good timing and power being useful only if the other two are in place. Clearly there is no power component to the recovery, so it is mainly about timing and balance.
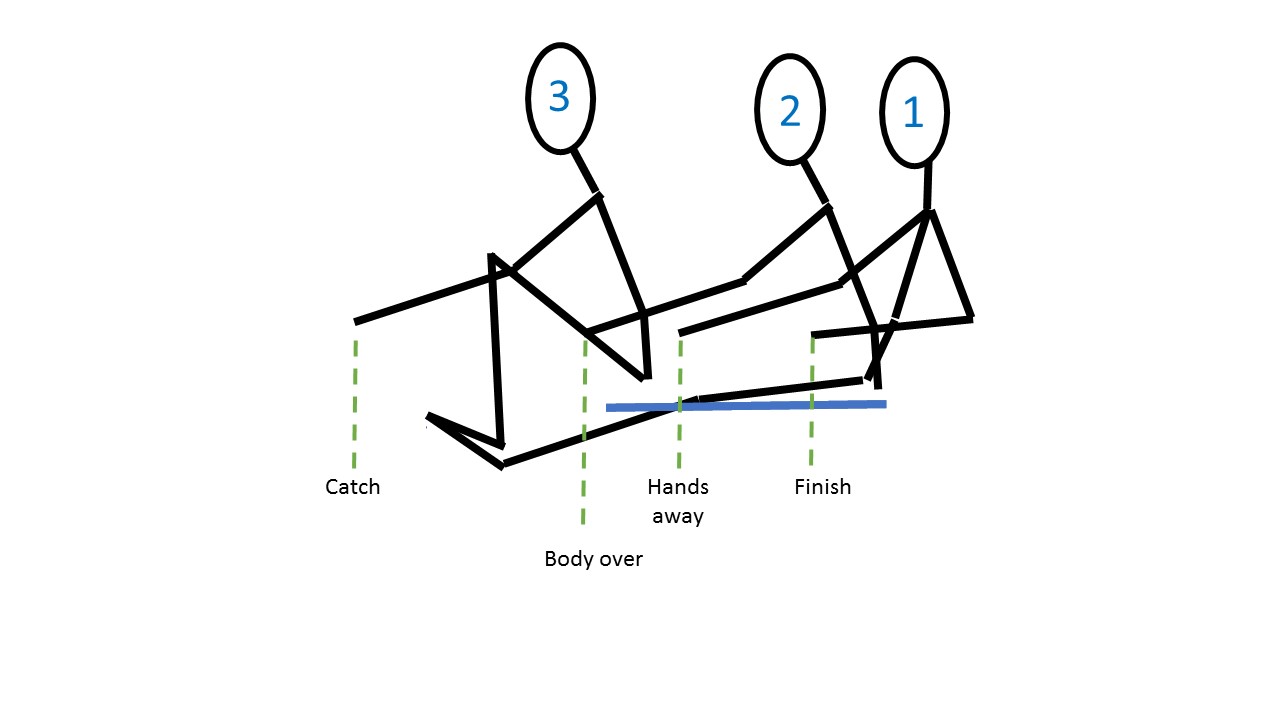
First, however, let’s look at the sequence of movements which make up the recovery:
Figure 1 Stick diagram showing the rowing recovery sequence
The recovery begins as the spoon is lifted from the water at the Finish (1). Before the body moves, the hands push away horizontally until the arms are fully extended at “Hands away”. The hands then pull the body over (2), the trunk pivoting at the hip while the slide remains at backstops. Only once the forward reach with the arms and the forward lean with the body are established, should the slide begin to move toward frontstops. As the slide moves, the upper body and arms should be perfectly still, the head high, the core active, the legs flexing at the knees and hips until the body arrives at frontstops and the spoon is dropped into the water at the catch (3).
Rowers sometimes need reminding that the catch should be a single contact between the squared blade and the water. Any contact between blade and water between the finish and the catch is bad, because the drag caused by a blade in or on the water is hundreds of times higher than the drag of the blade in air. Rowers should hate the sound of blades dragging on the water, because that sound is the sound of energy and speed bleeding from the boat. In a well-rowed boat, the recovery phase of the stroke should be silent except for the sound of the moving slides and the water flowing around the hull.
Timing the recovery for most rowers is less about when it starts than how fast it moves. Novice rowers particularly tend to rush the recovery, lunging forward into frontstops in their haste to get on with the next stroke. Part of the problem is that novice rowers frequently lack the fine control in their knee flexor muscles required to deliver a smooth recovery. Untrained or weak knee flexors tend to produce an uncontrolled twitch rather than a smooth contraction, so it can be surprisingly difficult for novice rowers to slow their progress up the slide. Many coaches will be familiar with the fact that it is often the weakest rower who is fastest on the recovery and so either catches early or is obliged to wait at frontstops for the rest of the crew to catch up.
Different coaches will sometimes say apparently contradictory things about slide speed on the recovery. As a rower I have been coached (by different coaches and at different times) to decelerate into frontstops in order to avoid checking the forward motion of the boat and to accelerate into frontstops to raise the bows slightly for the next stroke. My own view is that the greater contribution to boat speed is the deceleration into front stops. The reasons for this are unambiguous but perhaps not explained to rowers as often or as clearly as thy should be. During the recovery, the crew – who collectively weigh much more than the boat they are rowing, are moving in the opposite direction to the boat. If they hit frontstops hard, their collective inertia results in sharp deceleration of the boat. This can be seen in a sudden dip of the stern into the water, or in coxed boats, the involuntary pitching forward of the cox’s head and upper body. We call this error “stern check” and there is an interesting coaching trick for monitoring it here .
A useful cue for both rowers and coaches working on slide speed is the sound of the wheels on the runners during the recovery. If the rowers are accelerating into frontstops the wheels will sound a rising note. If they are decelerating, the wheels will sound a falling note – and if you can get the crew to produce that falling note you will get a gentler arrival at frontstops and less stern-check.
I’ve never coached acceleration into frontstops myself, but it is not quite as contradictory as it might seem. From my experience as a rower, the coach was not asking us to crash into frontstops. What he was asking for was a slight acceleration right at the end of the recovery and immediately before the catch. Understanding the reasons for this requires a short digression into very basic Newtonian mechanics.
At the end of the drive phase the crew are at backstops and moving at the same speed as their boat. As they begin the recovery, moving in the opposite direction to the boat, some of their kinetic energy is transferred from their bodies to the boat. As a result, the boatacceleratesafter the spoons leave the water (you can also think of this as the rowers pulling the boat forward toward their bodies with their feet). So the theory behind the deliberate acceleration into frontstops over the last few centimetres of the recovery is to accelerate the boat slightly before the catch. And the catch must go in milliseconds after that acceleration to keep the boat moving.
Whether it works in terms of producing additional boat speed I can’t say – which is why I don’t coach this technique myself, but evidently some coaches believe it does.
The last thing to say about timing is that the slide is only part of the story. In a good crew, not just the slides, but the hands and the heads will all be moving together, all following the rower in the stroke seat. This does not happen by accident, the crew have to work at it quite deliberately. And as no two occupants of the stroke seat will move in exactly the same way, the crew must adapt their timing every time the occupant of the stroke seat changes.
Balance in the recovery is one of the most challenging aspects of rowing for many average club or college rowers but at the same time is the most obvious characteristic of a competent crew. In normal rowing a crew should be spending two or three times longer on the recovery than on the drive and there is a vast difference in efficiency between a boat which, on each recovery, drags half its blades across the water and the efficiency of a boat which is balanced, with all its blades moving at the same height above the water.
The most important point to make about balance in the recovery is that it originates in the drive and finish of the previous stroke. Balance is set up during the drive and inherited by the recovery. If the boat was balanced at the finish of the previous stroke, that balance must be maintained during the recovery and into the catch. If the boat was off balance at the finish of the previous stroke, the boat must be rebalanced during the recovery – a more difficult task.
Maintaining balance is all about minimizing unwanted upper body movement – particularly sideways (lateral) movement. This is best achieved by using “core stability”, activating the muscles of the trunk by sitting up tall and pulling the stomach in slightly. The upper body position we need can be described as eyes front, heads up, shoulders down and chests out. This needs to be maintained throughout the stroke, not just on the recovery.
As with slide speed, coaches differ in their views on sideways movement. My preference is to coach crews to keep their weight on the centreline of the boat throughout the stroke. Seen from in front or behind, their heads should remain in line while their arms follow the arc of the blade’s handle. Other coaches will have the heads following the same arc as the arms, so that at frontstops the bowside and strokeside heads form two distinct rows. I’ve even seen rowers who have evidently been coached to lean toward the rigger during the drive and then return to the centreline on the recovery, producing a rather odd rotary motion. All of these can work, but keeping heads in the midline is simplest, particularly if crew members differ in height or weight. Also, the more asymmetric the technique, the greater the obstacles faced by rowers changing from one side of the boat to the other, something I feel strongly that all rowers (and particularly young rowers) should do regularly.
Recovering balance on the recovery can be challenging, which is why in a previous blog I emphasised the importance of keeping the boat balanced at the finish. If the boat is badly off balance at the finish, a novice crew stands very little chance of correcting it on the recovery. However, a slight imbalance can be corrected during the recovery if the crew has good core stability. This can be augmented if required (and if the crew has been coached in the technique) by the use of foot pressure. This works exactly as one might expect, with a dab of pressure on the rising side of the boat serving to stop it from rising too far. This is however a fairly advanced technique and in practice limited to fine-tuning the balance, not correcting gross errors.
In conclusion, the recovery is the phase of the rowing stroke which tells the world about the technical capabilities of your crew. A crew which can maintain the balance of their boat during the recovery with all their blades in the air, has the best possible platform for the efficient translation of power into speed. A crew which is unbalanced – or worse, drags blades across the water, are going to be handicapped by a less stable and less efficient boat.
(This is the third in a series of coaching notes and is probably best read with the preceding “Coaching the Drive”).
The Finish, like the catch, is a transition phase in the stroke cycle, this time from water to air, and like the catch, the quality of a rower’s finish is heavily dependent on the preceding phase of the stroke. For the sake of brevity, most of the advice in this blog is aimed at rowers rather than scullers and at big boats rather than small ones. However, the general principles apply to all boats.
Key attributes of a good finish:
It doesn’t start until the drive is complete. One of the common finish errors is to extract the blade from the water before the drive phase of the stroke is finished. The finish, like the catch, should be rowed as part of the recovery, not as part of the drive. The finish is not an opportunity to add more boat speed. You are at the wrong end of the stroke for more power to have any beneficial effect so any attempt to accelerate the boat with the arms during the finish probably does more harm than good. A good finish is about conserving the boat speed you have and precision is much more important than power. An easy diagnostic indicator is splash at the finish. A good finish is nearly splashless, leaving only a swirling puddle in the water.
It should be nearly frictionless. A modern rowing blade is a carefully balanced piece of technology. Downward pressure on the end of the handle with a single finger is enough to lift a squared blade from the water. If it needs more pressure than that, it is either partly feathered (not vertical in the water) or submerged too deep.
It should be quick. The boat is moving at the end of the drive and the blade is still in the water. It has to be raised out of the water quickly to avoid having it dragged by the forward motion of the boat, which will reduce your boat speed.
It should be precise. In a crew boat, the height at which the crew finishes each stroke dictates how level the boat is. The finish needs to be at precisely the right height, every time.
It should merge seamlessly into the recovery phase of the stroke. The normal stroke cycle is a continuous flowing motion and there should be no pause or hesitation at the finish during normal rowing. Some coaches do teach a pause just after the blade leaves the water, partly (I believe) to slow down the recovery, but this is taught as a drill, not as a technique to be used in normal rowing.
Let’s take look at the above attributes in more detail.
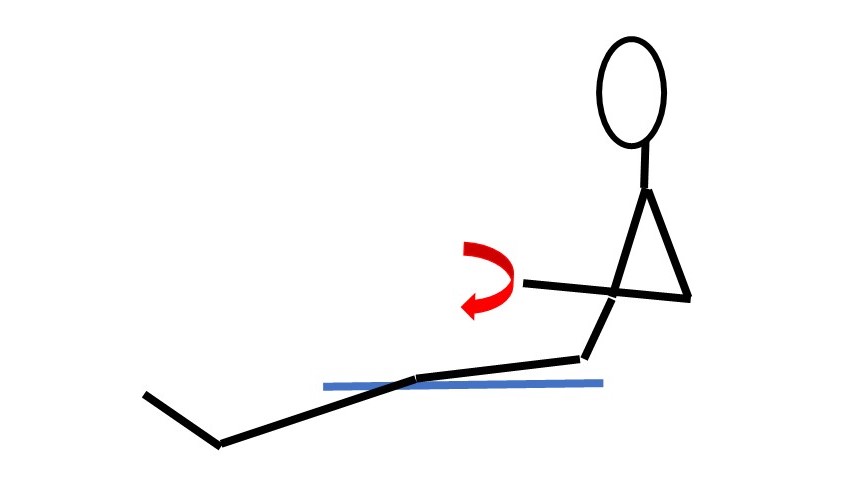
Finishing at the end of the drive. In simple terms, boat speed is a function of the force applied during the drive and the length of that drive in the water. To maximise the length of the drive in the water, the finish must be delayed until the drive is complete, when the rower is at backstops and the hands have stopped moving toward the bow of the boat. Only at that point should the hands start moving downward to extract the blade from the water. In practice of course, no rower is going to produce a perfect right-angle at the finish and their hands will actually move through a curve, but the essential part is that it should not shorten the drive and should lift the blade from the water without creating splash or wash. Many rowers seem blissfully unaware of the amount of splash they create at the finish, particularly during a race, but once they have been coached to be aware of it and reduce it, their finish technique improves rapidly, with more energy being converted into boat speed and less lost in throwing water into the air.
This stick diagram illustrates (in red) the movement we are looking for:
Figure 1 Diagram to show “tap-down” movement at the finish.
Keeping the finish frictionless and quick. A square extraction meets virtually no resistance from the water and is therefore ‘light’, exerting only minimal downforce on the rigger. However, many experienced rowers get lazy with the “tap-down” – the downward movement shown in Figure 1 above. Instead, at the end of the drive, they leave the blade in the water and let the motion of the boat feather the blade. Some will even let the spoon drag across the puddle. Perhaps this feels easier to the rower because the motion of the boat is doing the work, but precisely because of that fact, feathering in the water is a drag on the boat and decreases boat speed. If all crew members are doing the same the cumulative drag can be significant. If only part of the crew is doing it, it will unbalance the boat. This type of finish is significantly heavier than a square finish and puts more downward pressure on the rigger. Coaching rowers out of this error can be challenging, not least because from the rower’s point of view, a clean, square tap-down feels like more work than just letting the boat pull the blade out. A couple of approaches which have worked for me include:
Intermittent square blade rowing. During normal rowing, ask the rower who is feathering in the water to row a few strokes with a square blade. With less weight on their rigger at each extraction, her/his side of the boat will rise. This works well with more experienced crews who will have been compensating for the heavier extraction to keep the boat level.
“Showing the cox the spoon”. This feathered-blade rowing exercise keeps the blade square until the spoon is completely out of the water. This tends to work best with beginners.
Finishing at a consistent height
Coaching rowers to finish their stroke at the correct height is a key challenge in the combination of awesome power with precise balance that good rowing requires. There is no substitute for getting rowers to know their ‘reference point’. The reference point is not a fixed point but varies with the height of the rower, the seat, the rigger and the weight of the crew. It is the point on the rower’s body where the handle of the blade would come to rest at the end of the stroke if the rower simply let the squared bade float on the water at the end of the drive rather than lifting it out of the water. For the average rower that point will be somewhere on the lower half of their ribcage. Shorter rowers will find the point higher on their bodies and taller rowers will find it lower. Because of the variables mentioned above, the reference point can only be considered fixed for the duration of an outing (assuming the rower doesn’t change seats) and unless the same crew rows the same boat in the same seats with the same rigger heights it should be checked for every crew member on every outing.
If rowers know their reference points and pull through to them consistently the crew will be a big step closer to rowing a level, balanced boat.
Merging the finish into the recovery phase of the stroke
The finish and the recovery are phases of the stroke cycle during which the hands are moving in opposite directions, but how the two are joined together is important. I ask rowers to focus on the semi-circular shape of the stroke between the finish and the recovery as illustrated above, encouraging them to make a clear downward movement with the outside hand and to push the handle away on the recovery a few centimetres closer to (and parallel with) the side of the boat. I generally coach rowers to move their hands away at the same speed as they took the stroke, but there is no consensus on this and other coaches will differ. What I do insist on is that the hands never stop moving.
A good finish is undramatic, splashless and relatively quiet. It should leave a distinct pattern of deep eddies in the water – a ‘puddle’ which remains visible for several seconds after the boat has passed. It should not disturb the balance of the boat or check its forward motion. In short, a good finish is a good start for the next stroke.
(This is the second in a series of coaching notes. You may find it helpful to read it with the preceding “Coaching the Catch”).
The “Drive” is the ‘working’ phase of the rowing stroke. If we consider the four phases of the stroke (catch, drive, finish, recovery), the drive differs from the others in that it is as much about power as technique. The drive is the application of force to the handle of the blade to lever the boat past the spoon. That said, the quality of a good drive in the boat depends on how it begins at the catch and ends at the finish, and there are several different opinions as to what should happen in between.
The muscles powering the drive
The most important point to be made about the drive concerns the fundamental sources of its power. These are your leg muscles, the same muscles you would use for jumping. This is important, because rowers tend to be more aware of “effort” than “output” and so tend to see the power available from legs, body and arms as more evenly matched than they actually are.
Your leg muscles contain a high proportion of fast “twitch” fibres which can deliver the rapid acceleration required for running and jumping. The simple fact that your leg muscles can be used to jump off the ground means that they are, on their own, able to accelerate however many tens of kilos your body weighs to over 9.8 metres per second per second (the acceleration due to gravity) – and they can do that even if you aren’t a trained athlete.
This is a huge amount of power and more to the point it is an amount of power that your back and arm muscles are completely incapable of delivering. You could test this for yourself, although I would not recommend it, by attempting to “jump” your whole body into the air from a pull-up or by using your back muscles. Arm muscles are fast, but lack the power of the legs. Your back muscles are very strong but contain far fewer fast fibres and more slow fibres suited to maintaining body posture.
Leg power is therefore the foundation of a good drive. There may be different opinions on how we build on that foundation, but all coaches will agree that without the legs there is no drive.
For those interested in the anatomical detail, there is a useful summary of the muscles used in jumping here:
When we jump, knee extension and hip extension occur simultaneously. We unbend (extend) knee and hip joints at the same time to launch ourselves into the air. Similarly in rowing, the drive involves forcefully straightening the knees and opening the angle between the thighs and the trunk. However, in rowing, while we are using mostly the same muscles, we differ in the sequence in which they are used.
The difference can perhaps be summed up best in the following diagrams, showing how both the knee angle (K) and the hip angle (H) open during the stroke:
Figure 1. Catch Position
In the catch position (Figure 1) the rower is compressed into frontstops with the legs flexed at the knees and the body flexed at the hips. We have acute angles at both the knee (K) and hips (H) while the arms are at their longest (A). In a normally rigged boat, the rower’s heels will be raised off the footplate to maximise the length of the stroke and the pressure on the footplate at the start of the drive will applied through the balls of the feet.
Figure 2. Drive Position
During the drive the rower executes a sequence of movements. First, the knees extend, opening the angles at the knee (K1) and hip (H1). The arms remain extended, so their angle at the elbow (A) remains unchanged. As the knees extend the heels come down onto the footplate to support the drive.
Figure 3. Finish Position
Next the rower leans back, opening the hip angle further (H2). Lastly, the arms are used, drawing the stroke through to the chest and closing the angle at the elbow (A2). At the finish position the knees are fully extended and hips partly extended (at full extension the rower would be lying down in the boat).
The sequence ‘legs, body, arms’ is fundamental, but there are different schools of thought as to how soon during the drive the body should be used. I favour late use of the body, mainly because it helps rowers to focus their effort on maximising use of the legs and therefore of the exceptional power they provide to the stroke.
Common errors during the drive
2.1 Early use of the back. A common novice error (particularly with older novices) is to combine the use of the legs and body, swinging the upper body back as soon as the catch is taken. This error synchronises the knee extension to the hip extension, very much as they synchronise when we jump. The knees take longer to extend and the force applied to the blade – particularly in the early part of the drive – is therefore reduced. Sometimes, when you ask such rowers to stop using their bodies and arms and row ‘legs only’, rather than driving the slide to backstops position, their leg drive stops after just a few centimetres at the point when they would start using their backs – showing that they are not making full use of their legs.
In my view, if as a coach you can get rowers to focus on delivering the full power of their legs for the full length of the slide you have a good basis on which to build a powerful stroke.
A rower’s back needs to be strong enough to transmit this power from the legs to the arms. This is not always the case with younger rowers who sometimes have a tendency during the drive to let the legs push the slide back faster than their upper bodies. Their hip angle tends not to open as the knee angle opens (an error we call “bum-shoving” in the UK).
This situation becomes reversed with older rowers, ex-rugby players and others whose upper-body strength is proportionally greater than that of their legs. They will tend to use their backs early in the stroke and will under-use their legs. That is not to say that they don’t get to backstops, but they lose the legs-body-arms sequence and use their backs rather than their legs as the main driver of their stroke.
2.2 Early use of the arms is another novice error. Novice rowers often focus on the movement of the blade rather than the movement of their bodies and in their anxiety to move the blade at the catch they use their arms to pull on it rather than pushing with their legs. As was pointed out earlier, the arms can deliver only a fraction of the power available from the legs, so it is important to encourage these rowers to apply pressure on the footplate as the best way to move the boat.
While the arms are fully extended during most of the drive they are working under tension and their muscle strength is not a factor in the power of the first part of the stroke. I often tell rowers to imagine their outside arm (the arm connecting the shoulder to the end of the handle) as a rope with a hook on the end. Its muscles are not used until the legs and body have done most of the work. Early use of the arms will actually reduce the amount of power applied to the handle in the first part of the stroke because the amount of weight (or pull) which can be supported by the flexed arm is limited by the strength of the flexing muscles – mainly the biceps, whereas the amount of weight which can be supported by the extended arm is limited by its tensile strength, which is far greater.
Blade depth
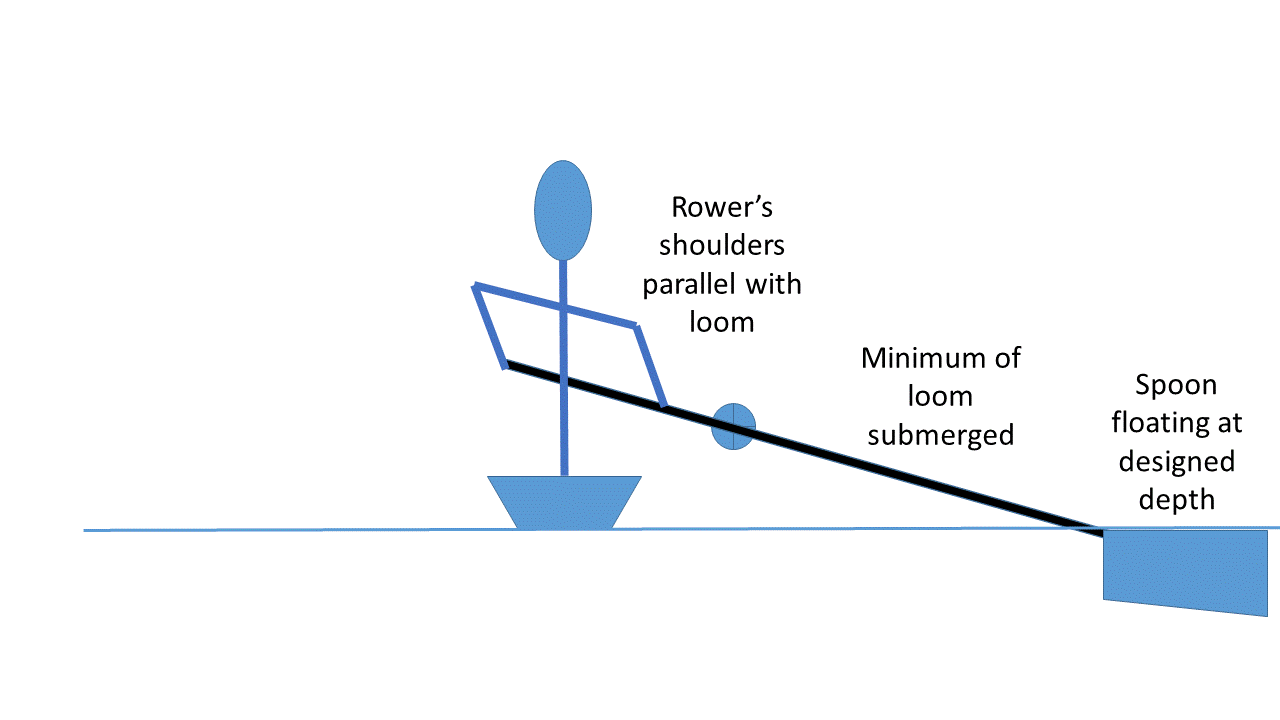
While there is at least a partial consensus on the good and bad technique in terms of body position (more on this later) there are a variety of views on the most efficient use of the blade. My personal preference as a coach of club and college rowers, is to encourage them to use the carefully engineered buoyancy of the blade as their guide to blade depth during the drive. In other words, I coach my rowers to let the squared blade float in the water at its ‘natural’ depth. Other coaches argue that more efficient transmission of force to the water is achieved by planting the spoon deeper so that its top edge is 4 to 5 centimetres below the surface during the drive. This may well be effective for elite scullers, but I think the video evidence from our best rowers shows that they work with the buoyancy of the blade to set the correct depth. Watch this video for example from 3:09 to 3:19 (unfortunately the IOC only allow us to watch this on YouTube).
“Washing out”
At the end of the drive as the rowers lean back and use the power of their arms to bring the handle toward their body, some rowers to pull the handle down into their laps or sometimes even to their upper thighs. This has the effect of bringing the spoon up out of the water before the stroke is finished, producing a telltale “wash” of agitated water on the surface rather than a deep “puddle” of swirling water at the finish. It also has the effect of lowering their rigger, upsetting the balance of the boat. I will cover the finish in more detail in another blog, but for the purposes of coaching a good drive, the way to avoid this error is to ensure that the spoon remains floating at its designed depth until the handle is almost at the rower’s chest at which point the outside hand taps down to extract the blade cleanly (with a minimum of splash) from the water.
Variations in drive technique
A comprehensive survey of the various techniques taught for the drive is beyond the scope of this blog, but luckily, for those who are interested, there are some useful summaries available online. This paper by Theo Körner:
dates from the early 1990’s and compares what were then known as the GDR (East German) and the Adam (West German) style. The Adam style dates from the 1960s and encourages rowers to use their backs earlier than we would today. The GDR style is much closer to modern techniques and emphasises an early leg drive followed by later use of the back.
Another paper by Dr. Valery Kleshnev on the biomechanics of rowing outlines two further variations, the Rosenberg style (from the USA) and the Grinko style (from the former USSR)
Kleshnev analyses these four styles in terms of their relative emphasis on leg or trunk musculature and their tendency toward simultaneous or consequent timing. He then shows typical power curves for each style – his figure 12 page 16 reproduced here:
He makes the following point which I find interesting: “Styles with the trunk emphasis (Rosenberg and DDR styles) produce more power because of better use of big muscle groups as the gluteus and longissimus muscles. However, these muscles are congenitally slow because they are intended to maintain body posture”
I don’t know how Kleshnev measured the different contributions of legs, arms and trunk but the overall shape of the Grinko style curve (d) in the figure above is closest to my view of the ideal for a well-trained rower. Peak power is delivered early by the legs, with the trunk and arms becoming effective later in the drive.
The shaping of the power curve is of course best rehearsed on a rowing machine where the rower gets immediate visual feedback on its shape.
While as I have said, the drive phase of the rowing stroke is more about power than technique, it is not without its subtleties and coaches continue to experiment in pursuit of more efficiently applied effort and greater boat speed.
If you Google the term “catch” you find “intercept and hold (something which has been thrown, propelled, or dropped)” and in rowing “the catch” is precisely about intercepting and holding the moving interface between the boat and the water. It is a simple term for a subtly complex concept, certainly a concept both coaches and rowers can find difficult.
Let’s start with the basics. In simple terms, the boat is moving, the water is still and the blade is going to provide the connection between the two, with one end still in the water and the other end moving with the boat. The catch puts the spoon in the water, allowing the rower to lever the boat past the spoon. In engineering terms, that lever is a “second order” lever, with the fulcrum at the tip and the load moving in the same direction as the force applied (as when lifting a load in a wheelbarrow for example).
This diagram may help visualise the stroke from catch (1) to finish (2) as it might be seen by an observer above the boat. The green arrow marks the direction of movement of the boat.
Figure 1. Plan view of the stroke from catch to finish
While it looks simple as a diagram, there are several things that can go wrong with the catch when actually rowing a moving boat.
Catch timing
If we consider the catch position at (1), just before the spoon enters the water, that spoon should be stationary with respect to the boat and therefore moving with respect to the water. As a result, when it enters the water it will raise a splash from the back face of the spoon – the part facing toward the bow of the boat. As a novice rower I found this a difficult point of technique to grasp as it seemed to me that backsplash must mean resistance to the forward motion of the boat. Surely the ideal would be to have no splash at all as the blade enters the water? I remember being baffled by coaches who were with the best of intentions, trying to coach me to raise backsplash at the catch. This only led to my taking the catch more or less early as I tried to get the blade into the water too far before frontstops, shortening my stroke with adverse effects on my timing, balance and power.
What the coach can see from the bank however, is that novice rowers tend to be late on the catch, with the spoon entering the water only after they have started the power phase of the stroke. It may feel more comfortable for the rower, but this novice error leaves a significant portion of the stroke in the air before the spoon meets the water, and while in the air the movement of the blade transmits no power to the forward movement of the boat. What my coaches were trying to get me to do was to ensure that ALL of the power phase of the stroke happened with the spoon in the water. Their error (in my view) was in trying to coach the backsplash as an objective in itself, rather than coaching the proper cause of the backsplash.
To repeat, a good catch is going to raise backsplash due to the forward motion of the boat. The rower does not have to add to this any additional forward motion of the spoon. Advice that I have found useful in coaching rowers is “Don’t let your hands change direction before the spoon is in the water”. While this advice clearly doesn’t stand alone, with most rowers it helps to:
Control the placement of the spoon at the furthest point of the frontstops position
Minimise loss of stroke length at the catch and
Trigger the drive phase of the stroke from the placement of the catch rather than vice versa
This “triggering” of the drive by the placement also helps with a second important aspect of the catch – its depth.
2. Catch depth
If the rower is timing the drive from arrival at frontstops rather than from the placement of the catch, there follows an almost inevitable tendency to row the catch as the first part of the stroke rather than as the last part of the recovery. In other words, the rower starts the power phase of the stroke with the blade in the air and actively rows the spoon into the water. This is going to make for a “heavier” catch with the spoon striking the water with the weight of the rower behind it rather than simply dropping the blade in at frontstops allowing it to fall under its own weight. When falling under its own weight the spoon tends to find its own depth as it is designed to. When rowed in, the rower has to set the depth and the simple fact is that some rowers can do this and some can’t.
Many novice rowers will tend to row deep, with the top edge of the spoon several centimetres below the surface. This is a significant error because as can be seen from figure 1 above, most of the blade inboard from the spoon is moving in the same direction as the boat. Putting more of it in the water therefore increases drag and slows the boat. Some rowers have never been taught about the careful management of buoyancy that influences blade design. A useful drill (in a stationary boat) is to have half of the crew square their blades and let them float. They will float with the spoon in the water and the loom out of the water. In the old days some coaches would tie a string or ribbon to the loom just above the spoon and tell the rower to keep it dry while they rowed. I find it effective to ask rowers to feel the buoyancy of the blade as they drop it in at the catch and try not to disturb that buoyancy as they take the stroke. This brings us to the last part of coaching the catch, which is the transition to the drive.
3. Catch position
Technically the catch and the drive are different parts of the stroke cycle but in practice, the purpose of the catch is to prepare for the drive, so the transition from the catch to the drive is an important one. The key message here is that the force of the early part of the drive is applied entirely by the legs pushing on footplate, not at all by pulling with the arms. As a coach, I want to see eyes front, heads up, shoulders down and chests out as the drive begins. If the rower is working correctly, the speed of the slide during the first part of the drive should be the same as the speed of the blade’s handle.
Figure 2. Stick diagram showing correct catch position
All of these details have to be prepared on the way in to the catch. The upper body position described above (eyes front, heads up, shoulders down and chests out) is set up not at frontstops but on the preceding recovery phase. If rowing with a feathered blade, the blade has to be squared well before the rower reaches frontstops. The catch should be all the rower is doing at frontstops. A tiny fraction of a second of complete stillness in the body and legs while the hands allow the blade to drop into the water. There should be no lurch forward to get extra length (this inevitably drops the rowers outside shoulder as they overreach). No turning of the head to look at the blade. No pulling up of the outside shoulder as the catch is taken, or early use of the back before the legs have delivered most of their drive on the slide.
Figure 3 Stick diagram to show common errors at the catch
However, once the leg-drive is established the catch is over. I’ll cover the drive and the finish in another blog.
I occasionally have to remind my students that while rowing is not an intellectual sport, it does make quite extraordinary demands on their powers of concentration. Very few beginners are in the habit (before they learn to row) of concentrating single-mindedly on how they are moving for an hour or more at a time. The level of concentration required is probably the second-biggest challenge that novice rowers face when stepping up from beginner status to rowing in competitive boats – the first challenge of course, being the required level of fitness.
The special requirement for concentration derives from rowing’s status as the ultimate team sport. In this respect it has similarities with, for example, a corps de ballet – where the movements of each member of the corps have to reflect the movements of the leader. In rowing, of course the range of movements required is much more limited, but on the other hand unlike a corps de ballet, a crew have to deal with the rapidly changing requirements of wind, water and potentially a race, rather than the fixed choreography of a staged performance.
There is a hierarchy of requirements which rowers have to concentrate on:
Timing – the pre-requisite for almost every other aspect of rowing
Balance – dependent on good timing but a pre-requisite for the efficient deployment of power
Power – the final component of a competitive crew, but very little use without balance and timing
This hierarchy is quite real. You can imagine an elite crew rowing and then take away their power, and you would still have a crew rowing well, but lightly. Take away both power and balance and they will still be moving the boat – but less efficiently. Take away their timing however and you really don’t have a crew. You have two, four or eight individuals in a boat, working against each other as much as they are working together. Anyone who has coached beginners in rowing will be able to visualize exactly what I mean.
Starting with the timing then, concentration on moving with the rower in the stroke seat is fundamental to rowing. However, stroke does more than just set the rate. Stroke also sets the ratio (the proportion of the stroke cycle spent on the drive phase versus the recovery phase), the hand heights and speeds, when to feather and square, when to catch and when to finish. Concentrating on moving with stroke throughout the full cycle from catch to finish and back again will require the full attention of any novice rower.
Balance similarly requires careful concentration. There are dozens of sources of imbalance in the boat and a number of them will affect most crews at some point. Working together to diagnose causes of poor balance, to correct them and to maintain the correction requires the concentration of the whole crew.
Of the three elements in the rower’s hierarchy of needs, only power does not of itself require careful concentration. But it is entirely dependent on the other two elements in the hierarchy and so the thoughtful application of power consistent with timing and balance, will always beat the application of power without such consideration.
Teaching crews to concentrate, not just occasionally but for the duration of an outing, is one of the key challenges in coaching. Learning to concentrate and to concentrate consistently on the right things is at the heart of becoming a good rower.


 I occasionally have to remind my students that while rowing is not an intellectual sport, it does make quite extraordinary demands on their powers of concentration. Very few beginners are in the habit (before they learn to row) of concentrating single-mindedly on how they are moving for an hour or more at a time. The level of concentration required is probably the second-biggest challenge that novice rowers face when stepping up from beginner status to rowing in competitive boats – the first challenge of course, being the required level of fitness.